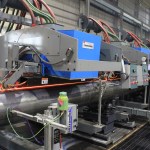
Dura-Bond Pipe McKeesport has made numerous investments into it’s pipe making operations. The new seam annealing and Phased Array UT equipment has been installed and commissioned in September of 2019.
PWHT (post weld heat treating) of ERW pipe is now facilitated by four 500 kW Seam Annealers manufactured by Thermatool. Precise and uniform heating of the weld seam coupled with patented Seam-Scan™ technology ensures quality and consistent results. PLC controls in conjunction with an infra-red camera allow the inductors to pivot +-15 DEG from top dead center of the weld to accurately track the weld seam.

Thermatool annealers combine a multitude of controlability and product interfaces to provide a consistent post heat weld treament. Operaters have a number of precise reports and information readily displayed on the control console.

Seam-Scan monitors the scarfed ERW Weld before entering the first annealer.  Utilizing an infra-red camera, Thermatool software is able to trace
the centerline of the weld prompting the seam annealers to move laterally maintaining the centerline of the weld.  This ensures a consistent, even postheat.

Smart Anneal allows the operator complete control of all four annealing stands. Output control is adjusted using one central interface and adjusts to meet changing mill speeds. Using Closed Loop Temperature Control Systems, this automatically adjusts power to each annealer to maintain heating duing each stage.

Phased Array UT
Following the tremendous advancements Phased Array UT weld inspection brought to Steetlon, Dura-Bond Pipe McKeesport followed suit with an Olympus system comissioned in September of 2019.

The Olympus AUT system utilizes phased array technology to inspect the weld area and ends of our ERW pipe. For the end inspection, a linear phased array probe is positioned parallel to the pipe axis and will inspect while rotating, covering the radial surface area of each end entirely. For the weld area inspection, curved phased array probes are used to inspect the weld seam for linear defects.

For weld tracking, a very unique method is utilized. A linear phased array probe (0 degree) is used to perform a dimensional scan of the weld area, and will center the on the deviation in wall thickness (created by the ID scarfing tool during the welding process), thus producing an extremely accurate and precise inspection. In addition to weld tracking, this particular probe will also inspect the heat-affected-zone for laminar defects.


